
Backup, wait a minute…
13.08.2018, last updated 05.03.2021 - Jeremy T. Bouse - ~7 Minutes
So in my earlier Getting started with Amazon Web Services post, I had laid out my 2-tier VPC solution that setup a Public and Private tier of subnets across three Availability Zones. I’d also mentioned that the subnets could make use of the Fn::Cidr function to simplify the CIDR block assignments within your CloudFormation template and that I’d discuss that in another post. Well, welcome to that post and a whole lot more!
As I went back to re-work my template to use the Fn::Cidr function I realized that I had only partially handled setting up the VPC to be dual stacked to support both IPv4 and IPv6. I had also noticed that I’d done a rather poor job with keeping their subnets for the respective tiers contiguous to make ACLs simpler by the way I’d ordered the subnets in my template. I also wanted to be able to have the flexibility to make use of 2, 3 or 4 AZs without having to maintain a whole lot of templates that I would then need to keep in sync when I’d make any changes. I had also mentioned setting up a 3-tier VPC solution that included a Data tier of subnets but I didn’t actually have a sample template written and available.
So I set out to correct the shortcomings I found and put together a more complete solution. The unfortunate side effect was that my existing CloudFormation stack for my VPC was not able to be updated due to the CIDR block changes which necessitated deleting the stack and recreating it with the new template. The good news was that I’m using templates that I already had so the process was quick and fairly painless with limited downtime.
Here you can see the new 2-tier VPC template in all it’s grandeur, but seeing as how we covered much of it’s design aspects in the previous post I’ll talk more about the 3-tier VPC template and the additions to it from the 2-tier. So let’s have a look at the new 3-tier template to start with.
While we had the VPCv6CIDR resource (lines 56-61 in both templates) previously that requested a /56 IPv6 CIDR block from Amazon, we never really actually did anything with this CIDR block as we only defined the CidrBlock on each subnet with the IPv4 CIDR block without including an Ipv6CidrBlock property and assigning it a /64 from our assigned /56 CIDR. Unlike IPv4 CIDR blocks for your subnet in AWS, the IPv6 CIDR block has to be a /64 assignment. If you take a look at the SubnetAPublic subnet resource (lines 87-99) you can see the CidrBlock and Ipv6CidrBlock properties on lines 92-93. Unlike the previous template iteration, instead of just defining the CIDR block statically this time I’ve used the Fn::Cidr function to break up my VPC CIDR blocks for me. Not previously using this function was a big reason why I wasn’t including the Ipv6CidrBlock as you didn’t know what your IPv6 assignment would be when the template was being created but it is available as a return value from the VPC resource which allows us to feed it to Fn::Cidr and request the subnets of the size we want.
The other major change now that we have IPv6 subnets being assigned comes down between lines 446 and 578 where we setup the default routes. We had the default route (0.0.0.0/0) for the Public RouteTables before but now we add the default route for IPv6 (::/0) to those RouteTables as well. As well I set the default route for IPv6 for the Private and Data tier RouteTables to go through the EgressOnlyInternetGateway which allows them to route traffic outbound over IPv6 but traffic can not route back inbound. While this means other IPv6 sites are reachable without setting up a NAT Gateway or a VPN Connection to route IPv4 traffic over, there are still some AWS resources that can’t be reached and one important one is CloudFormation itself.
Another new change to the template starts down on line 803 where we setup the Network ACLs for the Data tier. In this case we want to keep clear separation between the Public and Data tiers so it has deny rules setup for the Public tier CIDR blocks for both IPv4 and IPv6. When using a 3 tier approach you should only have traffic between Public and Private allowed and traffic between Private and Data allowed. Your front-end load balancers typically being placed in the Public tier which would need to talk with your application servers typically being placed in the Private tier. The your application servers in the Private tier would talk with your persistent storage or databases placed in the Data tier.
So the final detail to cover is the Fn::Cidr function itself. This helpful function takes 3 parameters and returns back a list of CIDR blocks which is why I use the Fn::Select to pick which block to select. The first parameter is the CIDR block to split up, so for our use case the VPC CIDR. The second parameter is a count of how many CIDR blocks we want returned, for this I wanted 12 as that would be the max needed for 3 tiers with 4 AZs. The last parameter is the CIDR bits for subnets subtracting the number of bits you want from either 32 for IPv4 or 128 for IPv6, so we’re using a /16 IPv4 CIDR for the VPC and we want the subnets to be /20 we needed 12 CIDR bits and we needed /64 subnets for IPv6 we needed 64 CIDR bits for those. We then use the first 4 (0-3) blocks returned for the Public subnets which fall under a contiguous /18 subnet themselves for the tier. The next 4 (3-7) blocks get assigned to the Private subnets and the last 4 (8-11) block get assigned to the Data subnets. 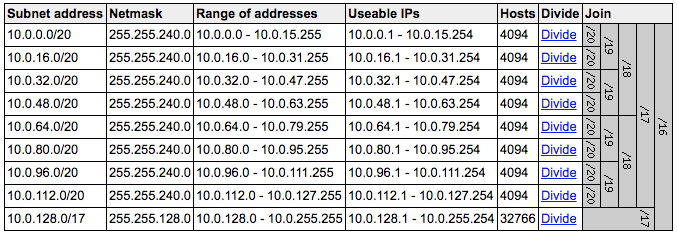
The subnetting is perhaps easier to see visually using a handy website I’ve found online. Looking at the image to the right you see the subnet layout for the 2-tier template using the default CIDR block which only has the Public and Private tiers so we only need to divide it into 8 /20 subnets. 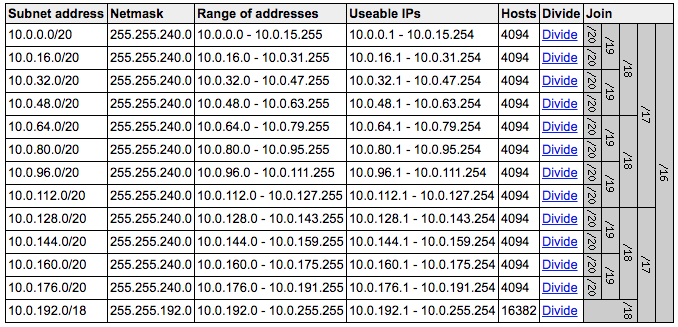
The image on the left then shows the subnet layout for the 12 /20 subnets needed for the 3-tier solution. Using a visual tool to assist with dividing out the subnets can be very handy, but as you could see from the template itself we don’t need to code the actual subnets themselves and instead let the Fn::Cidr function do the work for us. You could mix and match your subnet CIDR sizes if you wanted as they don’t all have to be the same size. You would then just need to modify the last two parameters to the Fn::Cidr function to reflect how many subnets you needed to be generated of that size and how many bits for subnetting. You might also then need to change the index for the Fn::Select to get the right block if you needed to skip some.
To better understand this let’s consider this scenario, you want a 3-tier VPC using the CIDR of 10.0.0.0/20 for a small sandbox environment with 4 AZs. You think you only need /24 subnets for Public and Data but you need /23 subnets for Private. In this case you would want to use 8 for the CIDR bits for the Public and Data subnets while using 9 for the Private subnets as the third parameter. The second parameter for the subnet count is a bit tricky given the different sizes. You still need to calculate the /24 subnets that make up the Private subnets between the Public and Private so you would need to set the count to 16 on Public and Data but set the count to 8 on Private.
Your Fn::Select indexes for Public would remain 0-3 as they are still the first 4 subnets out of the 16 and the Data indexes would become 12-15 as the last 4 subnets. In the case of the Private subnets you would then use the indexes 2-5. To define the Public CIDR covering all 4 subnets you could use the count of 4 and CIDR bits of 10 then take the first index. You can execute the simple test case template above which will only create a S3 bucket and produce the values for the subnets in the stack Outputs.
I do hope you find this informative and helps you in developing your AWS environment. As always feel free to check out the templates in my repository and adjust to your needs as they are a compilation of my findings and experiences.